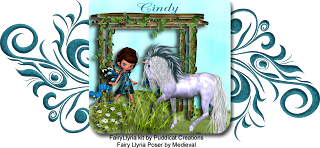
I'm a PS user and have recently started making tags. I'll share how I created the one above but warn you that this will probably be different in format than the PSP tag tutorials you are used to. For one thing, I take notes as I go, but rnever remember to do screen shots of each step. However, for what's it's worth, I'll tell you how I arrived at the tag above.
The tagger kit I used is Fairy Llyria by Puddicat Creations and can be found here at Sunflower Scraps Boutique:
http://sunflowerscrapsboutique.com/boutique/index.php?main_page=product_info&cPath=1_99&products_id=1247
The kit is named for the cute Poser fairy inside called Fairy Llyria which is by Medieval.
In PS:
1) open a 6" square transparent canvas
2) open paper 18 and layer over center of transparent layer
3)open paper 4 and cut a hilly shape using template of your choice. I used Scrapdesafios_Shapes_15 & sized the template down.
4) duplicate the shape cut in step 3 and darken to your taste. Place this layer slightly behind the original and merge down into one piece.
5)take your green hilly shape and place at the bottom of paper 18 for ground.
6) add the arbor as shown in tag
7) add light blue flowers to approximately the middle back of the ground section
8) place the unicorn on the hilly part to the lower right as shown.
9) place fairy on left about one inch from bottom
10) place more light blue flowers to left of fairy
11) add the bush with white flowers in lower left corner
12) take the grass element, stretch and squish down a bit until you like the shape and place near the middle at the bottom of the paper
13)add drop shadows to layers as desired
14) merge visible forming a collage square in the center of the canvas
15) use the rounded square cookie cutter shape on the collage square to remove corners
16) open new 6" transparent canvas, add grid, and move the collage square to the center
17) open doodle 2, flip horizontal and position to left so that it will be placed as you see in the finished tag
18) move that layer so that part of the doodle is behind the collage square
19)duplicate doodle 2 layer, reverse and flip vertical positioning on right side of collage square as above
20) move layer 19 behind the collage square
21) merge visible
22) add name to tag [I used CAC Champagne font]
23) under tag in fine print credit the kit used and credit for Poser
24) merge visible and crop to finished size

1 comment:
Just a quick note to let you know that a link to this post will be placed on CraftCrave in the Graphics category today [09 May 02:00pm GMT]. Thanks, Maria
Post a Comment